Thursday, August 26, 2010

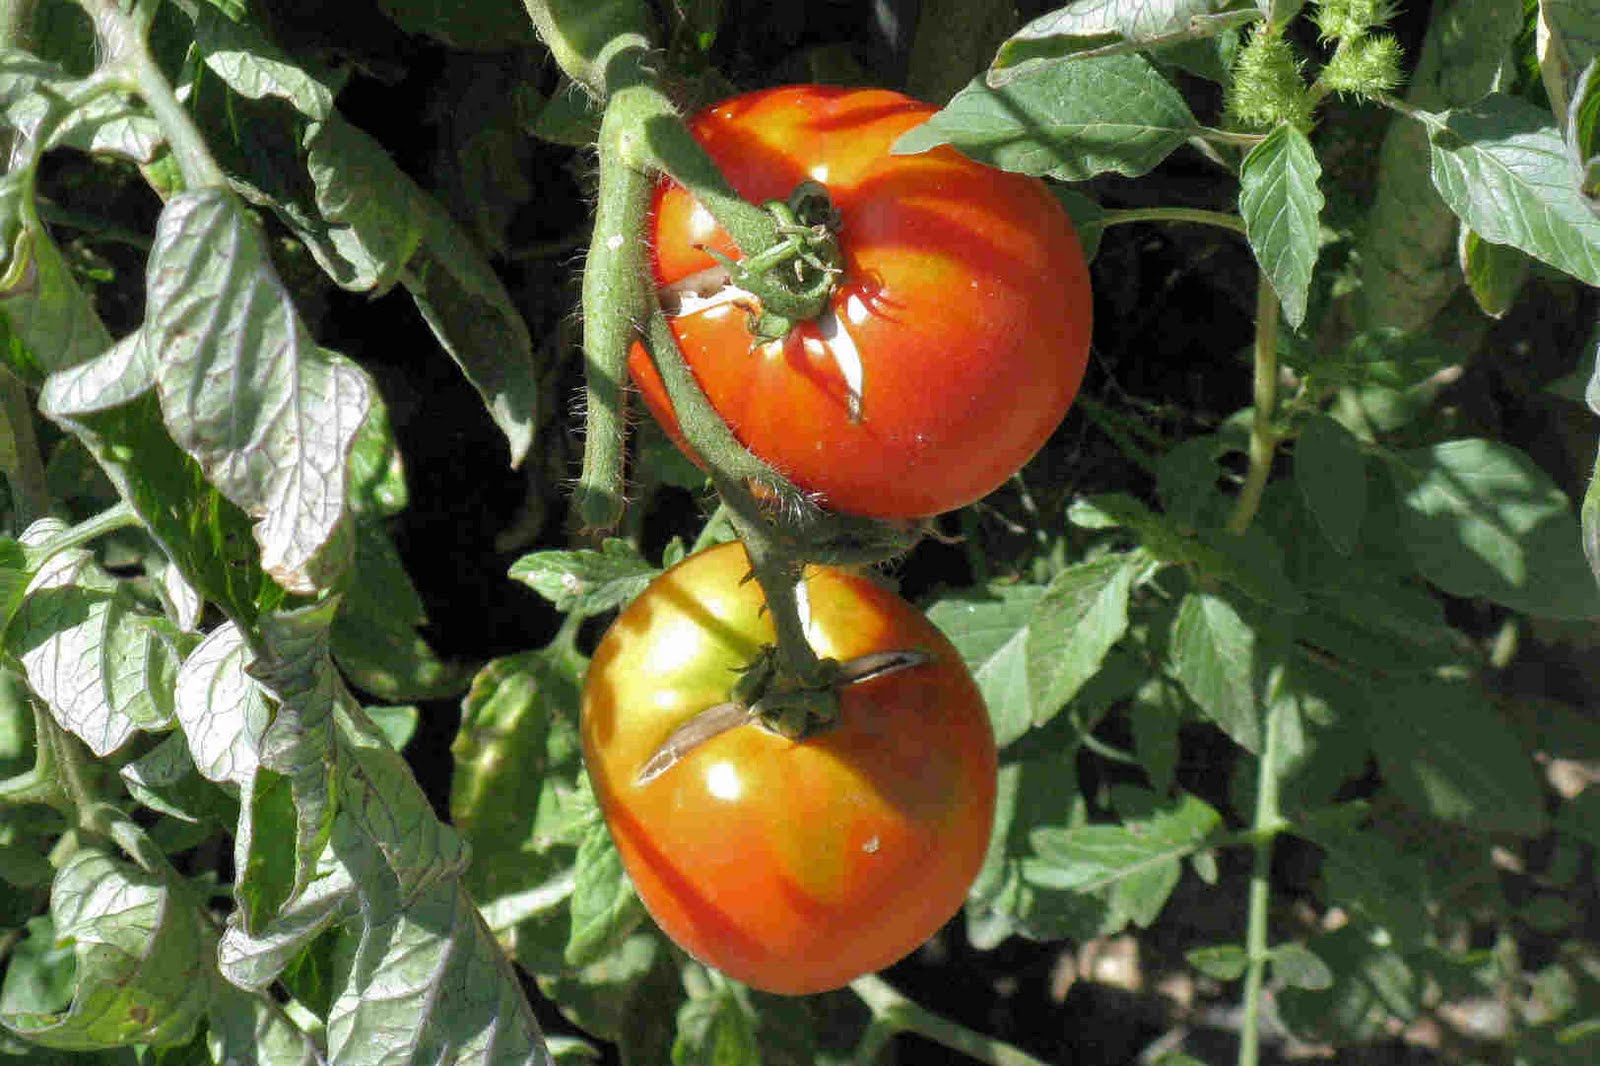
Tomato fruit cracking

Some tomato fruit are cracking now that we’re in the midst of tomato ripening season. Stem end cracks can be of two kinds but are both due to the same causes. You may see cracks that spread outward from the stem (radial cracks see photo right) or concentric cracks in circles with the stem in the center (photo left).

Cracks generally appear as fruit is maturing (mature green or coloring), rarely when small. The earlier fruit cracks, the deeper cracks become.

Growth cracks can be traced to rapid changes in environmental conditions, either moisture, temperature or both acting together. Dry weather followed by heavy rains is known to cause cracking in many tomato varieties. The strength and ability of the skin to stretch vary by variety and thus some varieties are marketed as “crack resistant.” They are worth a try if you have had problems.

High nitrogen fertilization stimulating rapid growth is also a cause for cracking. Slow release granules, organic sources or low strength fertilizers (soluble types in water) should be considered for fertilizing now.

Cherry type tomatoes are problematic for growth cracking. They are so small that when cracks occur they often run down most of the fruit (photo right - click to enlarge). Harvesting fruit before it turns dead ripe eliminates the possibility that further growth on the vine will result in cracks.

Do everything you can to even out the water to avoid growth cracks; irrigate not too much and not too little. Mulch soil to prevent rapid summer evaporation and dry down. The cherry tomatoes pictured are growing in a large container where it is always difficult to maintain even moisture in spite of daily watering.

Although gardeners can modify fertilization and watering practices, they can’t change the temperature. Temperature fluctuations and our dry air that toughens skins are probably big reasons we have cracking problems. Our average day-night temperature fluctuation for August has been 29 degrees F. That’s a wide range of temperature for a plant to handle.

Photo credit: Radial cracking - Carl Wilson, Concentric cracking - Iowa State University Extension, Cherry tomato fruit radial cracking - Carl Wilson

Thursday, August 19, 2010

Telling powdery mildew by its spots

Powdery mildew can be a chronic late summer and fall disease in the vegetable garden. I’ve found that some people mistake the normal color variation in leaves for the disease. Many squash have silver-white blotches like spots on a leopard. See photo of the normal blotches on the leaves of the All America Selections winner, ‘Papaya Pear’ squash right.

When squash becomes infected with powdery mildew, the dusty flour appearance of the disease looks more irregular and is on the surface instead of being part of the leaf. See photo left. Note that the disease appears on the upper leaf surface, not leaf undersides. Infected leaves can turn yellow, become distorted and fall prematurely (photo below right).

The severity of the disease depends on many things including plant variety, age of the plant, health status of the plant and weather conditions. Young, succulent growth is more susceptible than older plant tissue. Avoid late summer applications of nitrogen fertilizer.

Powdery mildews tend to be severe in warm, dry climates. High relative humidity is needed for fungal spores to germinate once they land on leaf surfaces. Shaded sites with poor air circulation favor disease. This is another reason to grow in open, full sun locations. These sites promote plant health by having ample sunlight for photosynthesis. They also ensure that humidity around leaves is quickly dispersed by adequate air movement.

Ground applied (drip) watering rather than overhead sprinkling also helps humidity control. Water in the morning rather than evening to take advantage of sunshine that quickly dries leaves.

If these cultural controls are not adequate, supplement with chemical applications of potassium bicarbonate (preventive) and neem oil (eradicant after infection). Read all label instructions and make sure the product you purchase is labeled for use on squash.

Photo credit: Healthy ‘Papaya Pear’ squash leaf, Powdery mildew infestation on squash leaves, Severe infestation and leaf yellowing – all three Carl Wilson

Wednesday, August 11, 2010

Peaches – what a haul

This is one of those years when we are reminded what peaches can really do. We only see peach fruit production like this in maybe one year out of five on the Front Range.

Because we don’t see peach fruit every year due to blossoms freezing in the spring, people may not know how to handle or prune trees. Excessive fruit loads will commonly break limbs in heavy bearing years. Propping up limbs (photo right) is a poor solution because limbs rub and damage bark when moved in the wind.

Preventing broken limbs goes back to June with fruit thinning, removing excess fruit when they are thumbnail size to leave only one fruit every six inches on limbs. This is what commercial peach growers commonly do and results in larger and sweeter fruit (fewer “packages” for the tree to sweeten up).

What can you do when limbs break? Not much, unfortunately but use a pruning saw to remove jagged edges and smooth the branch tear on trees. Basic pruning to wide angled scaffold limbs helps. Limbs at wide angles to the main trunk are much stronger than narrow angles.

As for fruiting wood, peaches produce only on one year-old twigs. The branches producing fruit this year should be removed in winter. Peaches are pruned hard removing the older, thicker branches to leave productive, young twigs (this year’s growth). Trees that aren’t pruned rapidly become dense and produce poorly. Light reaching producing branches is necessary to grow fruit.

For more details on peach pruning, see this post. Mark your mental calendar now to prune this winter!

Photo credit: Weighted down peach branch, Propped branch, Loaded peach tree – all Carl Wilson

Thursday, August 5, 2010

It's raspberry time

In spite of nearly every tree fruit escaping spring blossom-killing freezes and bearing well this year, small fruit remain more certain to produce yearly crops. Red and yellow raspberries are the most reliable. Black raspberries are not widely recommended because of lack of cold hardiness; however roots do survive to try producing fruit again in two years time. This may change as better adapted and more reliable black raspberry varieties are introduced.

If several red and yellow raspberry varieties are planted, you can realize a harvest from midseason to frost. Summer-bearing Nova, Killarney and Boyne produced crops in July and now the fall-bearing types Anne( yellow), Autumn Britten (photo above right) and old standby, Heritage are ripening and can produce up till frost.

Raspberries are naturally a biennial, growing canes one year and producing fruit on those overwintered canes the summer of the second year. The problem comes with overwintering canes. In most parts of the Front Range this usually isn’t a problem. With summer bearing types, you wait until the canes are finished fruiting in the summer of their second year to remove them.

Post WWII breeding produced the fall-bearing types that grow canes and produce fruit in the same season, With no canes to overwinter, harvests are more assured and pruning is easier since they are simply cut to the ground after the fall harvest.

What are the problems with raspberries? Homeowners often ask why their raspberries that once produced well fail to bear a crop anymore. Raspberries will last about ten years and bear best in the first five years of that period. After that accumulated viruses carried in by aphids decrease production. The planting should be removed and new stock planted. Don't get plants from fellow gardeners because of viruses. Buy virus-free stock from reputable nurseries. Plant in new soil that has been amended with organic matter and drainage ensured often by building a raised soil bed.

More raspberry information is available in the CSU Extension raspberry fact sheet. Give them a try.

Photo credit: Autumn Britten fruit, Raspberry canes, Carl Wilson

Wednesday, July 28, 2010

More butterflies than usual?

Is it just me or are many of you seeing more butterflies than average this summer? I also think I’m seeing fewer European paper wasps, a major predator of butterfly larvae. Perhaps that’s why.

The adults and larvae of butterflies require different food plants. The larvae of cabbage worm eat cabbage family plants (photo of damaged kale left, larva photo right). The white adult butterflies gather nectar from a variety of flowering plants (adult on thistle below left).

Control of cabbage worm includes the use of the natural bacteria Bacillus thuringiensis Kurstaki strain. See the CSU Extension fact sheet on Bacillus thuringiensis for advantages and disadvantages of using this natural control. Another idea is to exclude the adult butterfly from laying eggs on plants with the use of a floating row cover (photo right).

A colorful butterfly plentiful throughout the Denver area this season is the Two-tailed swallowtail. Adults (photo left) feed on geranium, thistle and milkweed plus other flowers, larvae (photo right) consume green ash and chokecherry. Gardeners curious about the yellow butterflies flying by can now rest easy knowing the larvae are not eating their vegetables.


To learn names, see photos, and find out the food plants for the adult and larval stages of common Colorado butterflies, see the CSU Extension fact sheet on butterflies in the garden.

Photo credit:
Cabbage worm damage to kale, Carl Wilson
Cabbage worm larva, Whitney Cranshaw, CSU Extension
Adult cabbage worm butterfly, Davud Cappaert, Michigan State University
Row cover, Carl Wilson
Two-tailed swallowtail adult, CSU Extension
Two-tailed swallowtail larva, Whitney Cranshaw, CSU Extension

Thursday, July 15, 2010

Seed now and watch for cutworms

Now is the time to plant seeds of late summer and fall crops where earlier ones have been harvested. Chose 60 day or less crops (carrots, beets, bush beans, radishes, Swiss chard, New Zealand spinach) or ones that like to mature in cooler temperatures (lettuce, peas, spinach, kale, collards, Asian greens). Note that a nice option with greens is that they can be harvested at almost any stage of maturity in the event of a short growing season.

With a temperature in the nineties F, small seed will be hard to germinate Use seed germination fabric and water lightly but frequently.

One seed germination hazard that some people think is a spring but not summer pest in cutworms. Cutworms are caterpillars that cut and kill tender seedlings round the soil line.
The notorious "miller moth" that people in our area recognize in the adult flying form (photo above left) is Army cutworm in its larval caterpillar stage. (See above right photo).

Note that there are also climbing cutworms as the person who brought chomped basil leaves in for diagnosis today discovered. Beet armyworm (see photos adult left and larva right) is a climber active in mid to late summer that chews on a very wide variety of plants. Variegated cutworm is another (photos below).

Cutworms typically feed at night and hide in soil cracks, under dirt clods or seek other cover during the day. If you are going to find them, you have to go out after dark with a flashlight.

Cutworms are preyed upon by ground beetles, rove beetles, spiders, tachinid flies, parasitic wasps and other garden insects as well as toads and snakes. If natural enemies aren’t providing sufficient control, consider your weed situation. Cutworm moths are attracted to weeds for egg-laying.

Promote rapid seedling growth with good cultural practices (right amounts of water, loose soil, proper planting times, etc.) and use transplants. Transplants and older plants aren’t as tender and less likely to be damaged at the soil line. Note that climbing-type cutworms will find the tender leaves on top.

Protect tender transplants and seedlings with cutworm collars (cardboard, foil) or milk carton rings. Insecticide baits are available for cutworms. They are more targeted than whole-plant sprays which may kill beneficial insects as well as pests. Note that B.t. (Bacillus thuringiensis) natural insecticide is generally ineffective against cutworms.

Photo credit: Miller moth Whitney Cranshaw, CSU Extension; Army cutworm larva Frank Peairs, CSU Extension; Beet armyworm adult Merle Shepard & Gerald Carner & P.A.C. Ooi; Beet armyworm larva Frank Peairs, CSU Extension; Variegated cutworm adult Ian Kimber; Variegated cutworm larva Charles Olsen, USDA APHIS PPQ.